

Everyone should know how to change a flat tyre. That’s right, I’m not just looking at the men out there.
There comes a time in everyone’s life where they get a flat - and knowing how to change saves time, money and a lot of stress. In this guide, we’ll equip you with the knowledge to confidently and efficiently change a punctured tyre, even when you’re nowhere near a service station.
Being prepared for unforeseen circumstances makes driving much safer, ensuring you’re never left stranded in an unfamiliar location.
With this guide, you’ll master this crucial part of being a prepared driver.
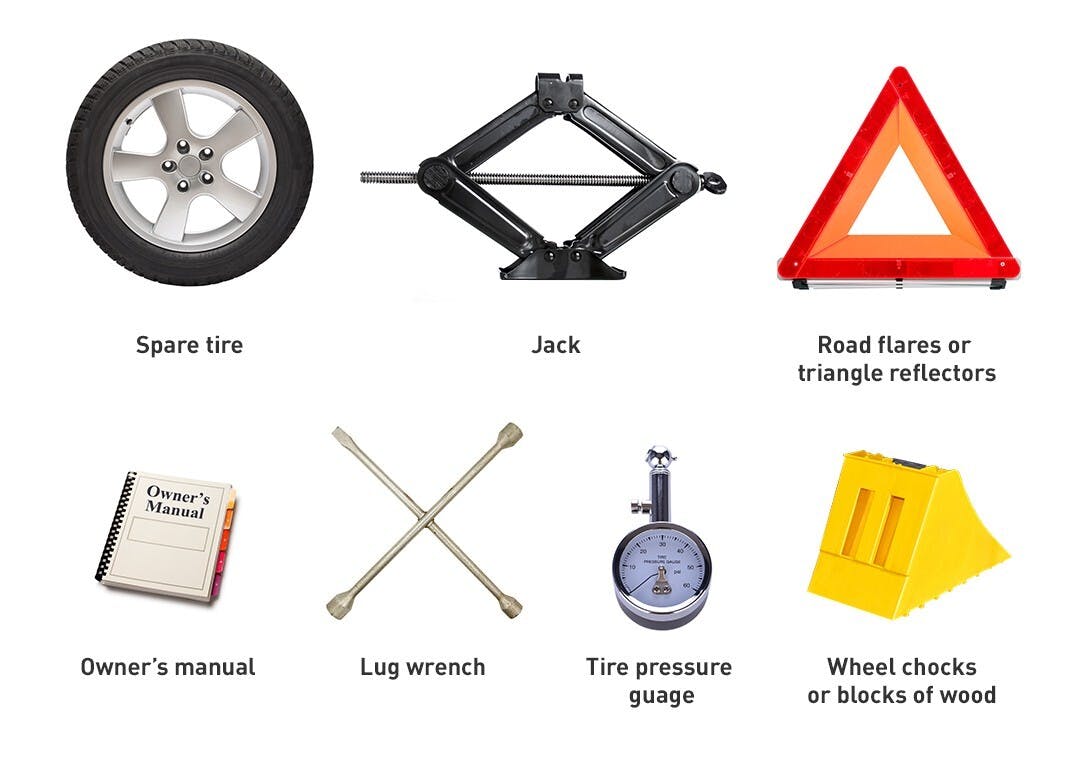
Assembling Your Tyre Change Toolkit
When facing tyre issues while on the road, being well-prepared is crucial. This means having all the necessary parts on hand - including a fully inflated spare tyre. Essential tools you’ll need to have handy include lug wrenches, a car jack, flashlight, gloves, wheel wedges, and small pieces of wood. It is also useful to have your car manual on hand, which will show the location of your car’s jack point. These items ensure that you can efficiently manage flat tyres. Equally important is ensuring your vehicle is equipped with a reliable wheel rim, which enhances your ability to handle such situations effectively.
Securing a Safe Spot for Tyre Change
To guarantee safety for both yourself and other road users, selecting a secure location for changing a flat tyre is paramount. This location should be sufficiently away from oncoming traffic, offering extra space if you need to replace rear tyres. It's advisable to consult your vehicle’s owner's manual for specific guidance on this process, including instructions tailored to changing tyres on both front and rear wheels. To prevent the vehicle from moving during the tyre change, place wheel chocks or wedges around the tyres. Furthermore, placing a small piece of 2x6” wood under the vehicle before using the jack can help avoid imbalance and ensure a stable lifting platform.
Activating Hazard Lights
The use of hazard lights is essential in alerting passing traffic and motorists to your presence and situation, especially when dealing with a flat tyre. The dashboard symbol for hazard lights typically resembles an exclamation point within a red triangle. It's important to activate these lights promptly upon recognizing a tyre issue to enhance your visibility and safety. However, be mindful that the regulations surrounding the use of hazard lights can vary by state. Therefore, it's important to be aware of and adhere to local laws when utilizing hazard signals during a tyre change or when addressing tyre damage.
Engaging the Parking Brake
It is essential to make sure the parking brake is applied when changing a tyre. By using it, your vehicle will be held securely in place and you can then remove the flat and feel reassured of its extra safety. To assess if the car’s brakes are successfully activated before beginning a tyre change, try pushing or pulling on the car, if no movement occurs then that confirms they have been engaged properly.
Activating the braking system while the vehicle frame performing this task ensures there won’t be any unexpected incidents caused by rolling away or shifting positions. Thus avoiding injuries from occurring.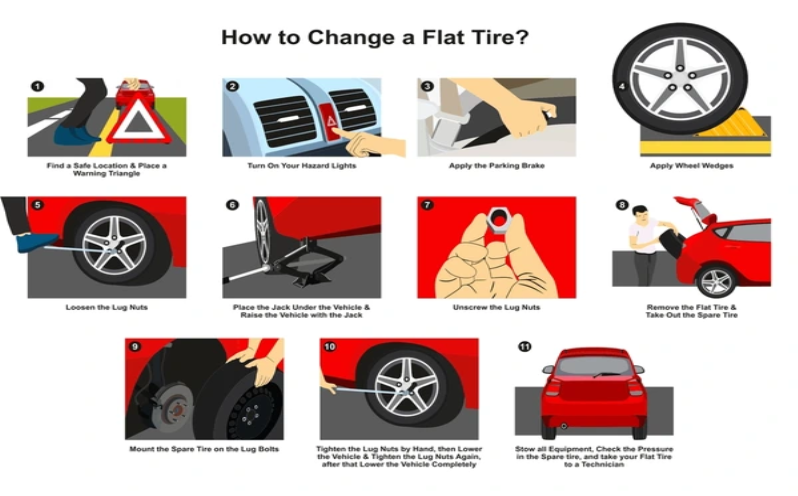
The Flat Tyre Replacement Process Step-By-Step
Changing a flat tyre is an essential skill that every driver should master to ensure safety and minimize the inconvenience of unexpected tyre emergencies. Here's a structured guide on how to confidently change a flat tyre and quickly get back on the road:
1. Unscrew the Lug Nuts
The first step to replacing a tyre involves loosening the lug nuts. This task requires a 1/2” impact wrench or a suitable lug wrench to turn the nuts counter clockwise. Apply sufficient force to loosen them but do not remove any of the lug nuts completely at this point.
2. Lifting the Car with the Jack
Before proceeding to lift your car, it’s vitally important that you position the car jack correctly and safely, which means placing it in the specific designated jacking position. You can find this in your car manual.
Once in place, turn the jack handle slowly clockwise, raising the car at least 6cm, or 2.5 inches, of clearance from the ground. Ensure stability throughout the entire process to avoid any injuries or damage.
3. Removing the Flat and Mounting the Spare
Once the car has been lifted, remove the lug nuts and pull off the flat tyre. The next step is to then align the lug bolts on the spare with the wheel bolts on the vehicle. Secure the tyre by hand tightening the nuts as firmly as possible, making sure the tyre is properly mounted.
4. Ensuring Everything is Back in Place
Once the spare tyre is properly fastened, lower the vehicle back to the ground carefully by turning the jack counterclockwise. It’s important to tighten the lug nuts securely on the bolts, in a crisscross pattern using the lug wrench. You can use your bodyweight for added torque to the wheel nut to ensure the tyre is securely fastened.
5. Fully Tightening the Wheel Nuts
With the vehicle lowered, tighten the lug nuts to ensure the spare tyre is fully and securely fastened to the wheel hub. It’s good practice to re-check and fully tighten all the lug nuts after a week of driving for proper precaution.
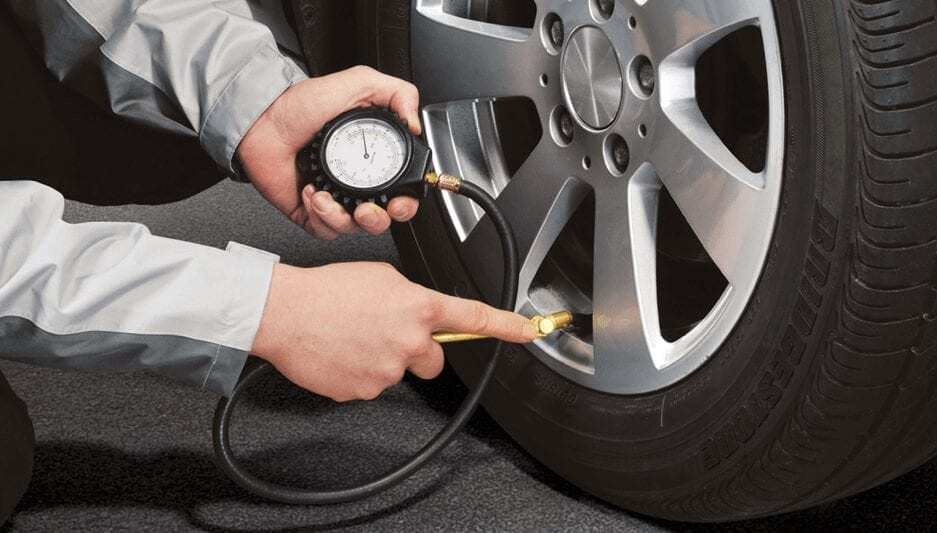
6. Check Tyre Pressure
Once the vehicle has been lowered, you should always check the tyre pressure to ensure all tyres are consistent. Driving on a poorly inflated rear tyre can be dangerous, as well as causing uneven tread to your other tyres.
7. Pack Away Equipment & Flat Tyre
The final step is self explanatory: pack everything away. This includes putting the flat tyre back into your car - don’t leave it on the road.
You should try to replace or repair the flat as soon as possible, to ensure you always have a backup on hand in the case of another flat.
Preventing Future Flats With Regular TyreMaintenance
Regular maintenance of tyre , such as maintaining the right tyre pressure and rotating them according to instructions, are essential for avoiding a serious flat tyre ever. Inspect your tyres’ pressures with a tyre pressure gauge once monthly in order to guarantee they operate at their optimum capacity.
It is important not only to have knowledge about how to change a spare tyre pressure or an unfixable punctured tyre, but also preventive measures that minimize flats’ likelihoods, like taking care of your car tyres properly from the beginning.
Onward Journey: Tips for Driving on a Spare Tyre
On your voyage, be sure to drive safely if you are on a spare tyre. Also known as a spare wheel cover or tyre a ‘spare tyre’, these tyres should not be used for long trips or at high speeds. Get advice from an expert promptly about whether the flat needs repairing or replacing instead.
As well, limit speed when using this type of tyre – keep below 50 mph (or 80 kph) and don’t go farther than 70 miles before getting another one fixed in place of it.
Change A Flat Tyre with Confidence
Mastering the skill of changing a flat tyre is essential for any driver. Westside Auto's comprehensive guide empowers you to handle a roadside puncture calmly and efficiently.
Preparation is crucial when changing a tire - and this involves not only having all the necessary tools needed… but also choosing a safe location for the tyre change.
As a recap, position the jack securely, carefully loosen the wheel lug nuts, and follow the rest of the steps in this guide carefully.
But how do you prevent flat tyres? The key is regular car servicing and tyre maintenance, which are vital in preventing unexpected flats, and extending the lifespan of your car tyres.
For all your car servicing needs, including tyre maintenance, choose Westside Auto Service. Our expertise will keep your vehicle in top condition, ensuring you’re prepared for any and all situations on the road. Visit our service center today to meet our friendly car specialists.